

Installation of a wooden floor on logs
Today it has become very fashionable to use wood to design flooring. In addition to being environmentally friendly, such a floor looks very impressive and expensive. Therefore, if you still decide to independently install the wooden floor on the logs, our experts will help you with this and will reveal all the secrets and subtleties of thorough laying.
to contents ↑Performance characteristics of wood flooring
Logs are powerful beams laid on the base floor and covered with a topcoat. Between the lags there is always an empty space in which all communications and wires, as well as heat-insulating material, are placed. Thus, you can make even the coldest room much warmer.
pros
Wooden logs have their advantages:
- Thermal insulation. When laying the floor, one should take into account the fact that both in a private and multi-story building, heat loss is about 10%. Wooden flooring with lags, due to the laid insulation, creates a powerful barrier that prevents the ingress of cold air.
Important! If the thermal insulation is properly installed, you can significantly save on heating the room.
- Soundproofing. If the wooden floor on the logs is installed in a multi-storey building, you can not worry, as the noise from the neighbors will not disturb you.
- Uniform load distribution. This is an excellent solution for private houses in which there is a low-power foundation. Logs in this case evenly distribute the load acting on them and transfer it to the foundation. As a result of this, the foundation also acts uniformly on the soil, thereby increasing its operational life.
- Leveling the floor. Logs are one of the fastest and fastest ways to level the rough floor before laying the finish.
- Logs can withstand loads of up to 5 tons per 1 square meter.
- Ease and simplicity of installation allows even a novice to cope.
- The budget analogue of underfloor heating.
- Long service life.
- The ability to replace any area without completely dismantling the entire floor covering.
Materials for the manufacture of logs
In most cases, such a base is made of wood. But in the modern building materials market there are lags made of reinforced concrete or metal. However, for household use, such a powerful and durable material is completely unnecessary.
Important! If you didn’t succeed in acquiring a whole beam for the manufacture of logs, you can use pairwise stitched boards of a proportional section size or a little more for these purposes. In this situation, you need to install the rib.
As for the construction of chopped houses, in this case, solid logs are used, which are cut from three sides. This method is more economical and is used with a rather meager budget. The most important thing is to properly dry the logs.
Important! In order for the logs to be well dried, they must be kept for about a year in a dry room.
Section selection
When installing the floor on the logs, you need to correctly select the cross-section of the bars, depending on the parameters of the material you have chosen.
Important! A section is a rectangle with a height of 2 meters and a width multiple of 1.5 meters.If the logs are laid on a ready-made wooden base, the size of the section will completely depend on the pitch of the beams located, on which the logs will rest further.
In addition, when choosing the bars, it is very important to consider the ventilation gap, which should be at least 2 centimeters. This is necessary so that when laying heat-insulating material between it and the back side of the final floor covering there should be a space through which the condensate formed could evaporate without impregnating the insulation.
Important! If the logs are laid immediately on the ground, it is also necessary to take into account the size of the run, which will subsequently be attached to the cranial beam.
Experienced craftsmen recommend purchasing floor lags, which in size will be slightly larger than you need.
Installation step
The consumption of materials depends entirely on how close the lags are to each other. Therefore, the installation step must be calculated at the design stage of the future flooring.
Important! Pay attention to the fact that this parameter is completely affected by the weight and strength of the finish coat you have chosen. For example:
- If the loads on the floor are small, the lags can be installed at a fairly large distance from each other.
- If the finish is weak, it is advisable to place the lags as close to each other as possible.
Ways of fastening lag
Depending on the basis on which the lag is laid, there are several basic ways of fastening. To date, the most reliable fasteners are metal galvanized corners or a special U-shaped fastener. Metal corners are fixed to a special wooden beam with one side and the other to the base with dowels.
Important! The depth of entry of the fasteners into the timber should be 3-5 centimeters.
Very often a situation arises that the length of the lag is simply not enough. But do not despair right away. You can lengthen it in two ways: by cutting and back to back. In both cases, the length of the additional stackable element must be at least 1 meter.
Important! If you need to build up several beams at once, for this they do the offset of the joining points of 50 centimeters or more. This is necessary for even load distribution.
Flooring material
For flooring on logs, inexpensive varieties of wood are most often used - pine and spruce, which were previously impregnated with special substances that prevent decay. Unfortunately, such wood is soft, therefore it is subject to mechanical damage due to the use of heavy furniture.
If a large number of people will constantly be in the room, in this case you should use larch or oak. Of course, such materials are much more expensive, but, nevertheless, more durable.
to contents ↑Important! To design a bedroom and a nursery, it is best to purchase alder or aspen, since this wood has a positive effect on health.
Step-by-step instructions for laying logs
Depending on the basis on which you install the log for the floor with your own hands, choose the appropriate installation technology. Next, we will tell you in detail about how to lay a wooden floor on the logs, taking into account the nature of the base.
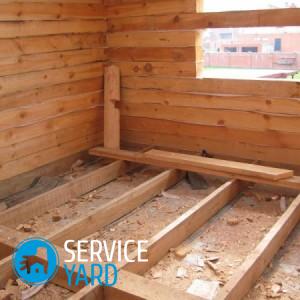
Ground laying
For laying logs on the ground, brick columns are most often used, which are located at a distance of 120 centimeters from each other. This makes it possible to save on the size of the cross-section of the bars, and also protects the wood from the effects of various destructive factors, including decay.
Important! In order to provide additional waterproofing, roofing material is laid between the bars and poles. The height of the underground, in turn, should be about 20-25 centimeters.
The arrangement of the floor on the logs on the ground should immediately before laying the load-bearing walls of the house or during the interior decoration of the room.As for the finishing of the floor, it is best to start after the whitewashing of the ceiling, as well as the finishing of the walls.
The sequence of actions is as follows:
- Using a vibrating plate or a wide log, compact the soil under the future floor.
- Organize drainage and non-compressible base. This can be done by pouring crushed stone with a layer of at least 5 centimeters.
- Use a vibrating plate to compact crushed stone.
- Make a formwork for each pillar. Pour cement mortar into it and strengthen with reinforcement.
- As soon as the cement hardens, cover each base with roofing material and build brick columns.
- On top of the columns, lay a few more layers of roofing material and coat them with bitumen mastic.
- On the finished posts, install the logs. Fix the cranial block on top.
- Make support for the rough flooring.
- From cheap and unprocessed materials, make a rough floor.
Important! Planks to the bars should not be fixed, since they should lie freely.
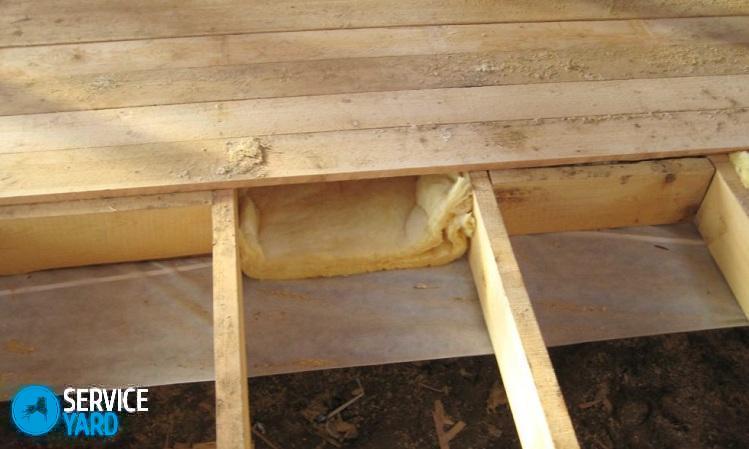
- After overlapping the walls about 15-20 centimeters, cover the rough coating with a layer of roofing material.
- Lay a heater on the waterproofing layer, and lay a vapor barrier on top of it.
Important! Please note that a gap of at least 2 centimeters should remain between the back of the floor and the vapor barrier. An exception can be only if a double-sided vapor barrier membrane is used, which does not allow moisture to pass through and does not allow it to penetrate the insulation.
Laying logs on a wooden floor
Beams used for wood flooring are usually made of square-shaped beams. If they are installed in increments of less than 80 centimeters, the logs may not be needed at all, since the finishing floor can immediately be laid directly on the beams.
The main difficulty when working with a wooden base is the correct determination of the step of installing the beams, as well as the strength of their fastening to the beams.
Important! The first lag is always placed at a distance of 20-30 cm from the wall. After installing each such element, it is necessary to check the evenness using the building level for these purposes.
As when laying on the ground, when installing the log on a wooden base, you will also have to make a rough flooring, so that you end up with a warm and comfortable floor. In this case, budget materials are used for thermal insulation - polystyrene, expanded clay, ecowool and cotton. Laying the insulation should be carried out, as in the previous version, on the previously laid waterproofing.
Laying logs on a concrete base
This method of installation is one of the most budgetary and fastest, and only a dry screed can compete with it. In the process, you may need the following tools:
- Anchor bolts (their length depends entirely on the thickness of the lags you choose);
- Hammer drill;
- Wood screws;
- Polypropylene dowels;
- Hammer;
- Plane;
- Self-tapping screws;
- Dowel;
- Hacksaw;
- Building level.
Important! Pay attention to the fact that the logs can not be laid directly on a bare concrete screed. You need to pre-treat the concrete with a special primer with deep penetration and cover it with waterproofing material. The bars themselves are treated with compounds that prevent decay.
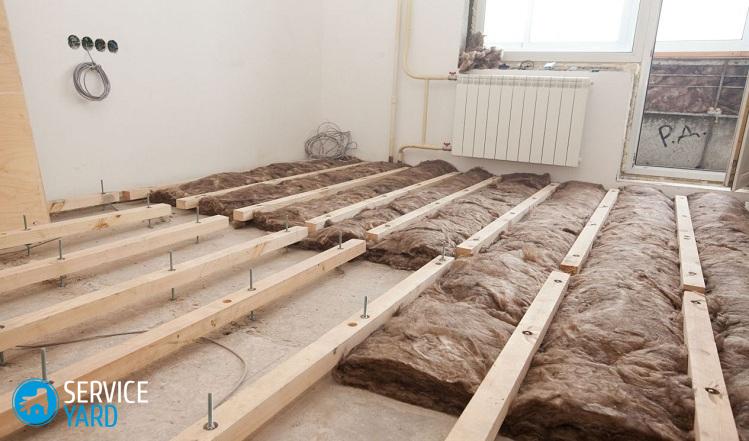
If the concrete base has large differences in height, you can adjust the lag level with the help of pads. You can use boards, plywood, chipboard or even ordinary wooden pegs for these purposes.
Important! Today's building materials market offers a special adjustable floor on the logs, which is mounted on screw supports. They can be twisted, thereby changing the arrangement of elements.
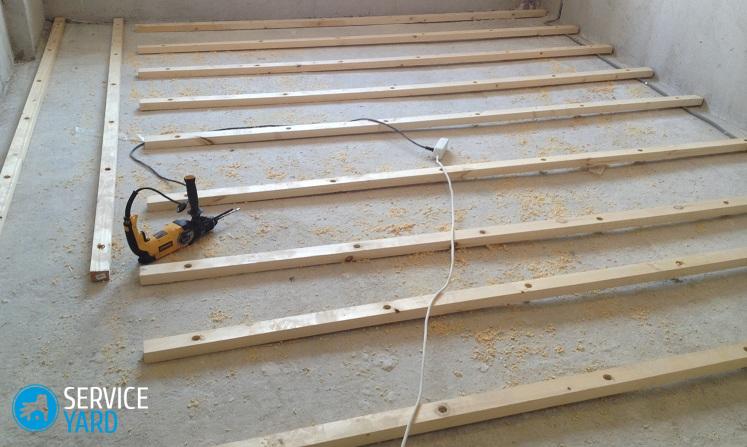
To install the lags on a concrete base, you need to adhere to the following sequence of actions:
- Clean the concrete screed from debris and dust. Primer the surface.
- After making allowances for the walls, cover the floor with waterproofing material.
Important! Rolled waterproofing must be laid with an overlap, while connecting the joints with a wide electrical tape.
- Arrange the logs. To do this, first lay the extreme along the opposite walls, stepping back from them about 20-30 centimeters, and after that you can start laying intermediate beams.
- Adjust the evenness of the edge elements.
- Drill a hole in the logs and the base itself. Place dowels and spacer elements for anchor bolts in them.
- Screw in bolts and screws.
Important! Pay attention to the fact that one lag should be fixed with two or three anchor bolts, which are located at a distance of 55-80 centimeters from each other.
- Using a level, check the evenness of all elements.
- Between the lags, place thermal insulation material.
- Install a vapor barrier over the insulation.
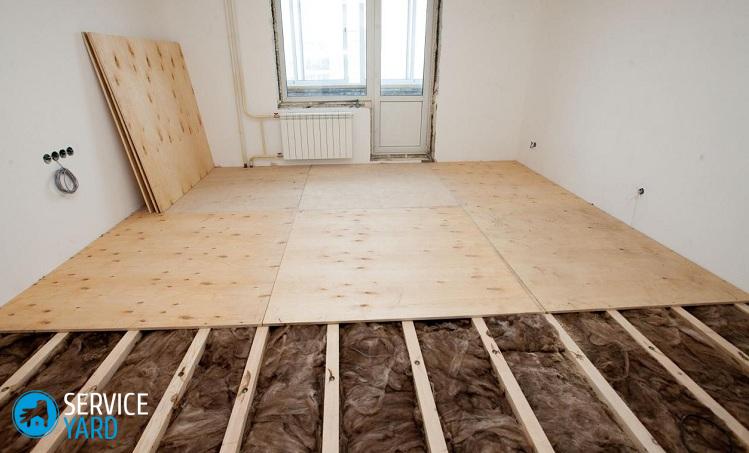
Fine flooring
Regardless of which technology was used in the process of laying the lag, the final stage is the flooring directly of the final coating. For these purposes, most often use boards or, as a more budget option, plywood. We bring to your attention several recommendations that will help you to lay the final flooring correctly:
- You should always start work from the far corner of the room.
- Plywood or boards need to be laid so that between them and the wall there is a gap of about 1 centimeter.
- Laying the subsequent rows, it is necessary to make the displacement of the material so that 4 seams do not converge at one point.
- Boards and plywood need to be cut so that the seam falls in the middle of the beam.
- Fastening must be carried out absolutely to all the bars, without leaving any allowances.
- To avoid splitting boards and plywood sheets, you should first drill holes under them for fasteners.
- At the end of the installation, a plinth is installed around the entire perimeter of the room.
Stock footage
Laying a wooden floor on the logs, although a scrupulous process, is not difficult at all, given all the above recommendations and taking into account in practice. We hope that our article will help you in arranging your home “nest”, and the wooden floor laid according to all the rules will serve you faithfully for many years.
- How to choose a vacuum cleaner taking into account the characteristics of the house and coatings?
- What to look for when choosing a water delivery
- How to quickly create comfort at home - tips for housewives
- How to choose the perfect TV - useful tips
- What to look for when choosing blinds
- What should be running shoes?
- What useful things can you buy in a hardware store
- Iphone 11 pro max review
- Than iPhone is better than Android smartphones
 (No ratings yet)