

DIY wardrobe
Your child’s life largely depends on his room, or rather on its arrangement. Therefore, it is necessary to do everything possible so that the children's room is organized in the best way and contributes to the convenient and comfortable development of the child. As a rule, in the nursery most of the things, including toys, are in a mess, however, if you put a roomy and convenient closet with enough drawers and shelves for all this, this issue can be considered completely closed. Better yet, if you can make a wardrobe with your own hands. In this case, all your ideas for putting things in order are quickly implemented.
to contents ↑Advantages of Do-It-Yourself Cabinet
There are many such advantages, and some of them are given below:
- independent production of a wardrobe for a children's room makes it possible to significantly save financial resources, since you do not pay for expensive work, but spend only on the materials themselves;
- the wardrobe can be made in such a way that it fits perfectly into the already existing interior of the children's room, without any changes and modifications;
- making furniture for your child, you put all your soul and a lot of positive energy into it, which will be absorbed by the tree of which the closet is made, and later the child will feel the warm energy of his own person;
- in the manufacturing process there is the opportunity to add or reduce something - this will depend only on you;
- you yourself choose all the necessary material, based on your considerations of quality and its acceptable cost.
In order to make a wardrobe for clothes with your own hands, you do not need to have any specific knowledge, for this you only need a regular tool and skillful working hands. And in our country, almost every man can be a master.
to contents ↑What are children's wardrobes?
Before you even begin to make a wardrobe for a nursery, you must first decide what kind of appearance it will take, how spacious it will be. The most popular options are available below:
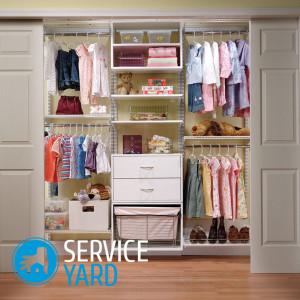
- Closet. This is a very convenient option, featuring increased capacity. In addition, because of its sliding doors, it can be installed in a fairly limited space, for example, in a small nursery. Unlike conventional cabinets, he does not need extra space to open his doors. It can be placed classically against the wall, or in the corner.
Important! For a children's wardrobe, it is not recommended to insert mirrors, as children will constantly leave fingerprints on them. And this material is unsafe because of its fragility.
- Corner cupboard. This model also fits well into a small space and is quite roomy. Given that children's rooms are usually not too large, a corner cupboard can be exactly the option that will suit absolutely everyone. Remember that for this cabinet it will be enough to select only one corner, and you can use the rest of the space for another purpose. Its doors can be different - both ordinary casement and more modern sliding.
- Wardrobe with drawings, which is always the most favorite among children. It can be made of different designs, the main condition only remains the availability of the ability to accommodate wide enough doors. Usually on these doors various funny drawings are put that children like so much.
- Combined wardrobe. Usually it is combined with a baby bed and often represents a whole corner. It is very comfortable and takes up little space, since the bed combined with it is usually located on the top floor, and the steps leading to it can be used as small shelves.
Important! There are also designs that consist directly of the closet and the combined bed, bedside table and table.
Thinking over the details of the children's wardrobe, you must remember that it should be convenient first of all for your child, since he will become his main user. Such details as shelves for things and toys, as well as all additional boxes, should be within its direct accessibility. So he himself will be able to get used to a certain order and will not wait for his parents. Having made a wardrobe with your own hands, you will make quite your own contribution to raising a child.
to contents ↑Important! If it is still too small, then simply insert an additional shelf into the cabinet, which will be located a little lower and will be its personal shelf. When the child grows up, you can always take it off.
Preparation for work
And now we move on to the parameters and details of the children's wardrobe:
- First you need to choose a specific place in the room where the closet will be, and then you will be guided by this in your calculations. Then you can proceed directly to the calculations of the height, depth and width of the cabinet, as well as decide on a mirror and shelves. To facilitate our work, we take paper and transfer our plan to it, indicating all the structural dimensions of the product.
- Now we look at the possible colors, trying to choose those that can go well with the interior of the room.
Important! If a material such as laminated particleboard is used, then practically unlimited possibilities for choosing a color open, since it is usually presented in the widest assortment, starting from the color of natural wood and ending with the texture of wild stone.
- Having finished with the color of the material, think about how you will begin to cut the details, since chipboards with a laminated surface are not recommended to be cut in the usual way because of the many chips along the edges, and you need a special tool to get an even and smooth cut. If you simply don’t have such a tool, it’s okay - you can correctly cut the sheet in any carpentry workshop, it will not cost too much.
Material and list of tools necessary for work
Almost all the required material, tools and fittings can be seen in large construction stores. You will need approximately the following:
- large sheets of conventional fiberboard - 2 pieces;
- large sheets of chipboard with a laminated coating - 2 pieces;
- special profiles for internal boxes - 4 pieces;
- edge for ends;
- hinges for doors - 10 pieces;
- a mirror to your taste - 1 piece;
- door handles - 6 pieces;
- packing of 5x40 screws;
- crossbar to hangers, 1 meter long - 1 piece;
- fixture for a mirror - 6 pieces;
- self-extending hanger - 1 piece;
- a small roll of tape;
- Euro screws;
- wood hacksaw;
- an electric drill with an additional nozzle for tightening screws;
- Forstner drill;
- a set of screwdrivers of various types and sizes;
- several drills for metal, better in a set;
- building level;
- 5 m tape measure;
- regular square.
This is the main list, and if you need something else during the course of work, then you can expand it yourself.
to contents ↑Drawing, cutting and sawing all the details
For self-production, you will definitely need your drawing.To simplify all this, you can simply outline each detail individually or, which will make your work even easier, take a specialized computer program and make all the necessary calculations right in it. Fortunately, there are a lot of such programs now.
If you want to use a computer for calculations, you will need to transfer the finished drawing to another program that displays all the necessary points for the correct cutting. At the exit, you will receive a fully finished drawing printed on paper, on which you just have to mark the edges for gluing the edges with a regular pencil.
to contents ↑Important! We have already mentioned how best to cut laminated sheets. Given all the difficulties that accompany this process, especially those associated with chips, we recall that it is better to give this work to a carpentry workshop by a professional. To cut the mirror, specialist assistance will also be needed - you are unlikely to be able to cut so evenly and beautifully.
Assembly order
After completing all the work with the components, you can buy accessories and proceed directly to assembling the wardrobe for the children's room with your own hands:
- First, attach an edge to the ends of all the parts already marked on your drawing. This is required so that its edges do not crumble on the plate and there are no unnecessary chips. The edge tape has a sticky base on the working side, which you only need to attach to the edges of the plate and then walk in moderation with a hot iron. After it cools down, you can remove excess edges with a knife. In the event that there are any irregularities, they can be easily smoothed out using zero sandpaper.
Important! Performing this part of the work, pay attention to the fact that the edge has a fragile base, and if you bend it strongly, it will simply break.
- Divide all the components of the cabinet into separate groups in order to assemble it in turn, and your drawing will assist in this.
- Now, with a pencil, make a working marking of the holes for the door hinges and fasteners.
- Having finished with the marking, drill the holes themselves with a drill, do not forget to observe the symmetry of the holes, otherwise the overall impression of the work will be spoiled.
- Using a screwdriver, screws and euroscrews, we assemble the base of the case, after which we drill holes for the door hinges, where we immediately install them.
- Where boxes and shelves will be installed, we mark out places for holes for their fastening. Remember that this is a very important point, and if you make a mistake and the holes are not strictly symmetrical, the drawers and shelves will not be able to look even.
- Drill, focusing on ready-made markings, the required holes, and install all the hardware.
Important! After the assembly process is completed, it is recommended to put special decorative stickers on all heads from the screws. They will completely cover the protruding metal heads and give even more appeal to your cabinet.
Useful Tips
So you have assembled your own children's wardrobe. As you can see, everything turned out to be not so difficult. And in conclusion, we suggest paying attention to some important points in the assembly:
- during operation, do not forget to make sure that all the components of the children's wardrobe are located in the correct order and perpendicular to each other;
- when you put the doors, first fasten the hinges, after which you can already apply the doors and draw all the necessary markings on them;
- in order for the mirror to be securely fixed to the cabinet, it is recommended, in addition to standard fasteners, to insure it with a special adhesive tape, which has a double-sided sticky work surface.
Stock footage
Do-it-yourself wardrobe for the nursery is a good idea both in terms of organizing the space of the room, and the design, and the budget.Do not be afraid to try yourself in such a useful job, because only you know how ideally your child’s room should look, and not the manufacturers of typical furniture!
- How to choose a vacuum cleaner taking into account the characteristics of the house and coatings?
- What to look for when choosing a water delivery
- How to quickly create comfort at home - tips for housewives
- How to choose the perfect TV - useful tips
- What to look for when choosing blinds
- What should be running shoes?
- What useful things can you buy in a hardware store
- Iphone 11 pro max review
- Than iPhone is better than Android smartphones
 (No ratings yet)